Tool Suppliers
11 April, 2013 Leave a comment
Suppliers
Otto Frei – United States, online shopping, international delivery
Tools
Saws – frames, blades, accessories – Otto Frei,
Tips and techniques, questions and answers, works and commissions.
11 April, 2013 Leave a comment
Otto Frei – United States, online shopping, international delivery
Saws – frames, blades, accessories – Otto Frei,
23 March, 2013 Leave a comment
Saws – 70-90mm piercing or jewellers/jewelers saw (ess.), and associated blades, maybe #1 and 1/0, certainly 2/0, and for thinner material or fine detail 4/0 or finer. Hacksaw and coping saw. For jewellers saw blades, the larger the number, the finer the blade. 2/0 is the standard for cutting thicker pieces of metal, 4/0 is for small and fine detail. Use what is comfortable.
Otto Frei saw blade and saw frame page.
The jewellers saw is an essential tool for the manufacturer and is the most versatile of all cutting equipment. It will cut straight lines, angles, go around tight curves and can even be used as a file (for those places that are a bit awkward to get a file into). A saw with the blade inserted correctly also wants to cut. You don’t have to apply any pressure at all and it will go where you point it. Thick and thin material, hard or soft, and it doesn’t distort or damage the metal, other than the vacant line it leaves behind as you cut through.
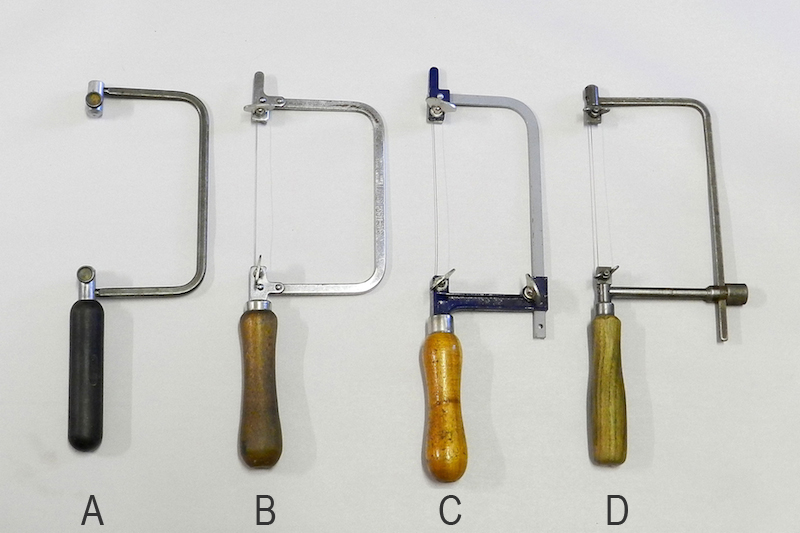
Fig.1 – Standard Jewellers Piercing Saws
This image (Fig.1) shows a collection of standard jewellers saw frames, often called piercing saws. There are basically two types of saw frame, rigid (A and B) and adjustable (C and D). Model A is a “Swiss Rigid” (also available as adjustable), model B an “English Rigid” and model C is a “German Adjustable”. There are many variations of both rigid and adjustable frames, some of them being ridiculously expensive, others needlessly fancy. The centre two frames can be purchased for less than $10 each and they are the ones I would buy, they are the ones I use. If you are going to purchase just one, get an adjustable frame with an 85-95mm throat. It is the most versatile, they are cheap and spare knobs are readily available. They will last a lifetime. Frame B is over 25 years old while frame D is over 40. Both are used nearly every day.
A 90mm throat will enable you to carry out ordinary jewellery manufacturing and repair work without the need for special cutting tools. A plain ring blank, for example, will never likely be greater than 90mm long. That 90mm throat allows you to cut a length of material for any ring up to that size from a sheet of metal. Frame C has a throat of 70mm, a little short to cover all the possible ring sizes but it is a great size when you do intricate work and your eyes need to be a little closer to what you are cutting. Those wearing glasses or magnifying units (a nose can get in the way too) will find the narrower frame less trouble.

Fig.2 – Special purpose piercing frames
These next two frames (Fig.2) are designed for cutting particularly long strips or lines and the frame on the right will allow you to cut 300mm into a sheet of material. These frames might be used to cut material for bangles or neck pieces. Those interested in silver-smithing would use one to cut discs for a bowl, sections for boxes or blanks for cutlery. Most metal suppliers will provide sheet and strips cut to order, so these frames are not an essential part of the jewellers toolkit. But if you prepare your own material, they are handy to have. The adjustable versions are available up to a depth of 200mm. Again, they are inexpensive in this style.
A side benefit of the adjustable frame is the ability to recycle broken blades. Blade packs come in twelve lots of twelve – called a gross. They can be fragile and to some, expensive. I was employed in a workshop that made trophies and on one occasion, the master allowed two apprentices to cut the pieces for a particular trophy. They broke over 1100 blades making it. With experience, you will become flippant with blades. I sometimes go for a week or two without breaking one; other times I break them as I pull them out of their slot. In humid environments, because of rusting, they break as quick as you look at them. Either way, when they are broken they are binned. The adjustable frame allows you to shorten it to accommodate a broken blade if you wish, a great way to save money.
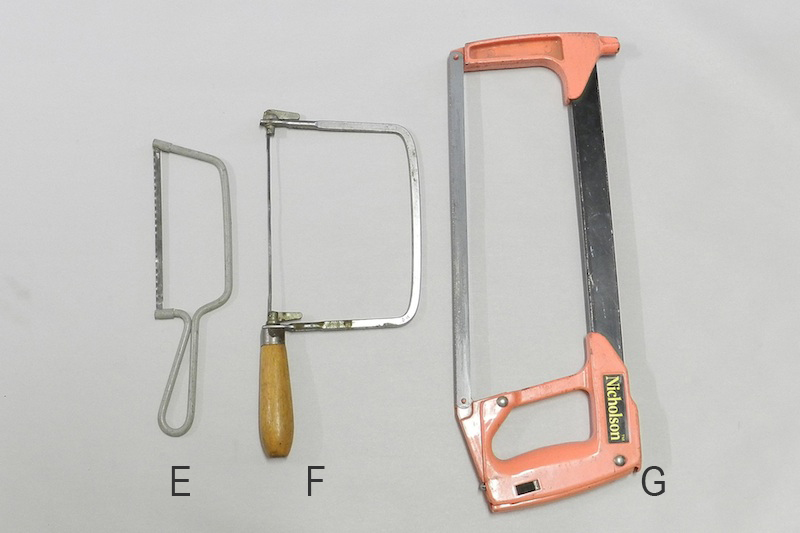
Fig.3 – Metal Workers Saws
Now, the metalworkers saws. All these saws are readily sourced from a hardware store. Model F is a coping saw, used more for woodwork than metalwork but blades are made for use with metal. The blade is rotatable and as such, the back of the frame may be perpendicular to the cutting line rather than behind and following it. Any angle in between is possible as well. The coping saw will also allow you to follow shallow curves. While similar in appearance to the jewellers saws above, it is not a replacement and lacks the ability to follow tight curves. The hacksaw, model G, lives up to its name. Designed for grunt work as it were. For thick rod, bars, sheet, if you have to go at it hard, it’s the one to go for.
All of these saws are used in my workshop, some everyday, others rarely so. Over the years, you will probably find that all will have come into your possession. $10 is all you need to get started though. That will get you a decent adjustable frame and a pack of 12 blades. You might break them all before you have finished your first piece, but even a good jeweller has days like that.
20 March, 2013 Leave a comment
Pretty simple to make, fiddly and time consuming to carve. The clients grand mother had a pair of diamonds, 1ct each, in a ring. It was broken down and each of her grand daughters was given one of the diamonds. The shoulder diamonds were an after thought. Unless circumstances make it unavoidable, I don’t like putting diamonds of the same shape but different eras together. In this case, the centre diamond is an old-brilliant cut from the 1920’s. To put it with a modern brilliant cut from post 1960 makes note of the combination. I sourced the old single cuts to go with the main diamond so as not to detract from it.

White gold and diamond, engraved engagement ring.
Details: 18ct white gold engagement ring. Main setting is bezel set 1ct old-cut with 3pt single-cut diamonds pressure set in the shoulders. Hand-made ring with engraved shoulders.
13 March, 2013 2 Comments
This is an idea I came up with for a man actually. Not this ring in particular, it was his wedding ring. He was a plumber, so not a very good carpenter. He use to keep missing the nail with his hammer and hit the knuckle of his ring finger, so many times that his knuckle size was about ten sizes bigger than his actual finger size, maybe more. I have been trying to find a method for holding the nail more simple and flexible than the use of the thumb and index finger when attempting such a task. I can’t. He must have been getting a blind man to hit the nail while he held it. It is so way off target, it’s the only explanation. He wanted to wear a ring but he also had to be able to take it off when working. Wearing it on another finger was not an option for his wedding ring. I offered a few options, the bangle type arrangement was the one he went for.
From that initial ring, the design pictured below (the hinge and catch) evolved and is the one I use almost exclusively. As you can see, it has developed into something really simple. It is just a three bar hinge joint and a snap catch. Yet, it has never failed. Even so, a few clients aren’t sure about its security and ask for an extra lock or safety catch. It does however make the catch more bulky and can interfere with the flow of the design of the ring. In its simplest form, it is quite minimal when the ring is closed. There is some science behind it (or maybe it’s just common sense) and there are a few rules to abide by for it to work effectively. I use this for anyone who has trouble with arthritis and can be adapted to almost any ring.
I am pretty proud to say that other jewellers have tried to copy it and can’t make it work, yet it IS almost as simple as it looks.

Hinged ring for difficult to fit fingers.
Details: In the above example, 18ct yellow gold hand-made ring, with box hinge and snap clasp, bezel settings containing green and blue Australian sapphires.
12 March, 2013 Leave a comment
(UNFINISHED POST)
Jewellery simply defined, is anything worn for adornment, serving no actual purpose other than making you look and feel good.
Sooo…, what do you want to make first? A ring, pendant, earrings, broach, chain, a hair piece, something to hold clothing together? What about objects instead of jewellery? And what materials do you want to make it out of? Gold, silver, copper, brass, pewter, iron, plastic, leather, found objects…? How far would you like to go in making jewellery? Do you want to specialise in an area like chain making or will you be happy just glueing shells to broach pins? Do you want to make or do you want to assemble? Do you want to make money?
I ask a lot of questions but, the things you want to make, the materials you want to make them out of, your level of commitment and the direction you want to take will to some extent determine your tool requirements. You don’t have to commit to a complete set of tools or even need all that might be used by the working jeweller, but some decisions need to be made early, based on that direction you want to take. For example, the use of the precious metals (and even brass, iron, aluminium) will require a different heat source to that of pewter. You won’t need a heat source if you chemically weld, that is to say – glue, your pieces together (although you may need one if you make a mistake and need to pull it apart). Heavy working tools, like hammers and anvils, won’t be required if you are going to piece together components. Surprisingly sophisticated items of jewellery can be made with a small and simple set of tools. It is amazing what a hammer can produce when used by a master beater 😉 (I shouldn’t have done that).
I will make lists that are appropriate for the different styles of jewellery and the materials you may use. To start off, because I am one, will be the metal workers list, the tools that will be required by those using the traditional metals of the jeweller i.e. gold and silver along with copper, brass and monel, for that is what I know best. Also, cheap doesn’t necessarily mean nasty, for your jewellery or your tools. Some of these tools can be sought at a good hardware supply store, often cheaper than the specialist suppliers sell them for. They may not be made in Germany, Japan or the United States, but they will suffer the abuse a hobbyist is likely to give them. For some tools, it is just not worth the extra expense, and I will point that out as the need arises.
(too come – a link will open in a separate window with images, descriptions, pricing, sources and detailed usage for the associated tool)
(ess.) = essential, (hr) = highly recommended
Saws – 70-90mm piercing or jewellers/jewelers saw (ess.), and associated blades, maybe #1 and 1/0, certainly 2/0, and for thinner material or fine detail 4/0 or finer. Hacksaw and coping saw. For jewellers saw blades, the larger the number, the finer the blade. 2/0 is the standard for cutting thicker pieces of metal, 4/0 is for small and fine detail. Use what is comfortable.
Files (ess.) – 150mm flat file, 150mm half round file, set of needle files, flat bastard or mill file.
Emery paper (ess.) – basically sand paper, at least a few sheets each of 400, 600, 800, 1000 grit emery paper – or carborundum or wet’n’dry paper. The lower the number the courser the paper. Grades up to 5000 are usually readily available and when used that fine will almost give a polish to the metal. Also, a couple of sticks measuring 300mm long x 20mm wide x 6-8mm thick. These are used to wrap your sand paper around and work in much the same way as a file.
Pliers (ess.) – smooth jaws on all. 2 x flat/flat, 1 x flat/half round, 1 x round/round, 1 x flat needle nosed, 1 x round needle nose. Box joint pliers are stronger than lap joint. If only working in silver, copper, brass and pewter, or wire work, lap joint will be all you need.
Hammers (ess.) – ball peen, wedge or cross peen, soft head (hard rubber, plastic or hide).
Measuring Devices (ess.) – steel rulers (150mm for general, 300mm if making bangles, 600mm if making chains), vernier callipers (need to be able to measure to at least 0.1mm), spring gauge (the jewellers measuring device), dividers (for marking), set square
Mandrels – ring mandrel (hr), link mandrels. Mandrels are forms, usually round and tapering (cone shaped) to wrap your metal around and form the inside shape of rings, links, bangles, etc. They can be anything, screwdrivers, nails, drill bits, wooden rods and any shape to suit your requirements. The typical jewellers mandrels are made of steel and are available in many sizes and many shapes. The ring mandrel is a long tapered steel stick with markings on it to gauge the size of rings, for new rings and for ring resizing.
Gas Torches (ess.) – (melting, soldering, annealing devices) – This will depend on your style of jewellery and the materials you use. Consider it essential. There are many varieties from the simple “Primus” style torches that run off a small handheld bottle or big versions connected by hose, to versions that run off compressed air, oxygen and LPG or acetylene, ending with oxy/hydrogen units. They can cost as little as $20 for a kit to many thousands for the hydrogen units. There are also laser welders, electric arc welders and soldering irons. For some processes, a kiln might be the heat source you require.
Soldering Sundries (ess.) – heat resistant mat (fire bricks can be used), tweezers (heat resistant, titanium, spring…), binding wire, trivets, plaster of paris, porcelain dish and small natural fibre paint brush, borax cone or powder, squeeze bottle with water, jewellers pickle in a wide glass jar (sulphuric acid or for safety, use sodium bisulphate), water in a wide glass jar, washing soda in a wide glass jar.
11 March, 2013 1 Comment
One more for the road. It’s hard to get something I like in the theme area for this blog. Fiddling about takes up so much time…
This is a white gold pendant. Paved, as they say, with diamonds. They are 1pt diamonds and each has a diameter of 1.4mm, about 150 of them in a space 21mm wide and about the same high. It is about 5mm thick with a slightly domed cross-section. This didn’t take very long to make but it took daaayyysss to mark out, drill the holes, carve the claws and set the diamonds. This was a commissioned piece too. I went to the trouble of doing a drawing to scale and to size using CAD (computer aided design) with a rendering to give an almost photorealistic impression of the finished piece, all following the clients instructions. I had to be sure they were sure they knew what they were getting. Disappointingly, it was returned with no explanation, delivered by a third-party. I had posted it to the client in good faith without receiving payment, there wasn’t much I could do. I got the feeling that they wore it to a function and didn’t need it after that. It’s not the sort of thing that sells quickly, a puffy heart covered in diamonds, so I “gave” it away for the cost of materials to recover expenses. A big loss, but I did enjoy making it. A real challenge with all those little beads having to be carved out of a solid lump of gold.
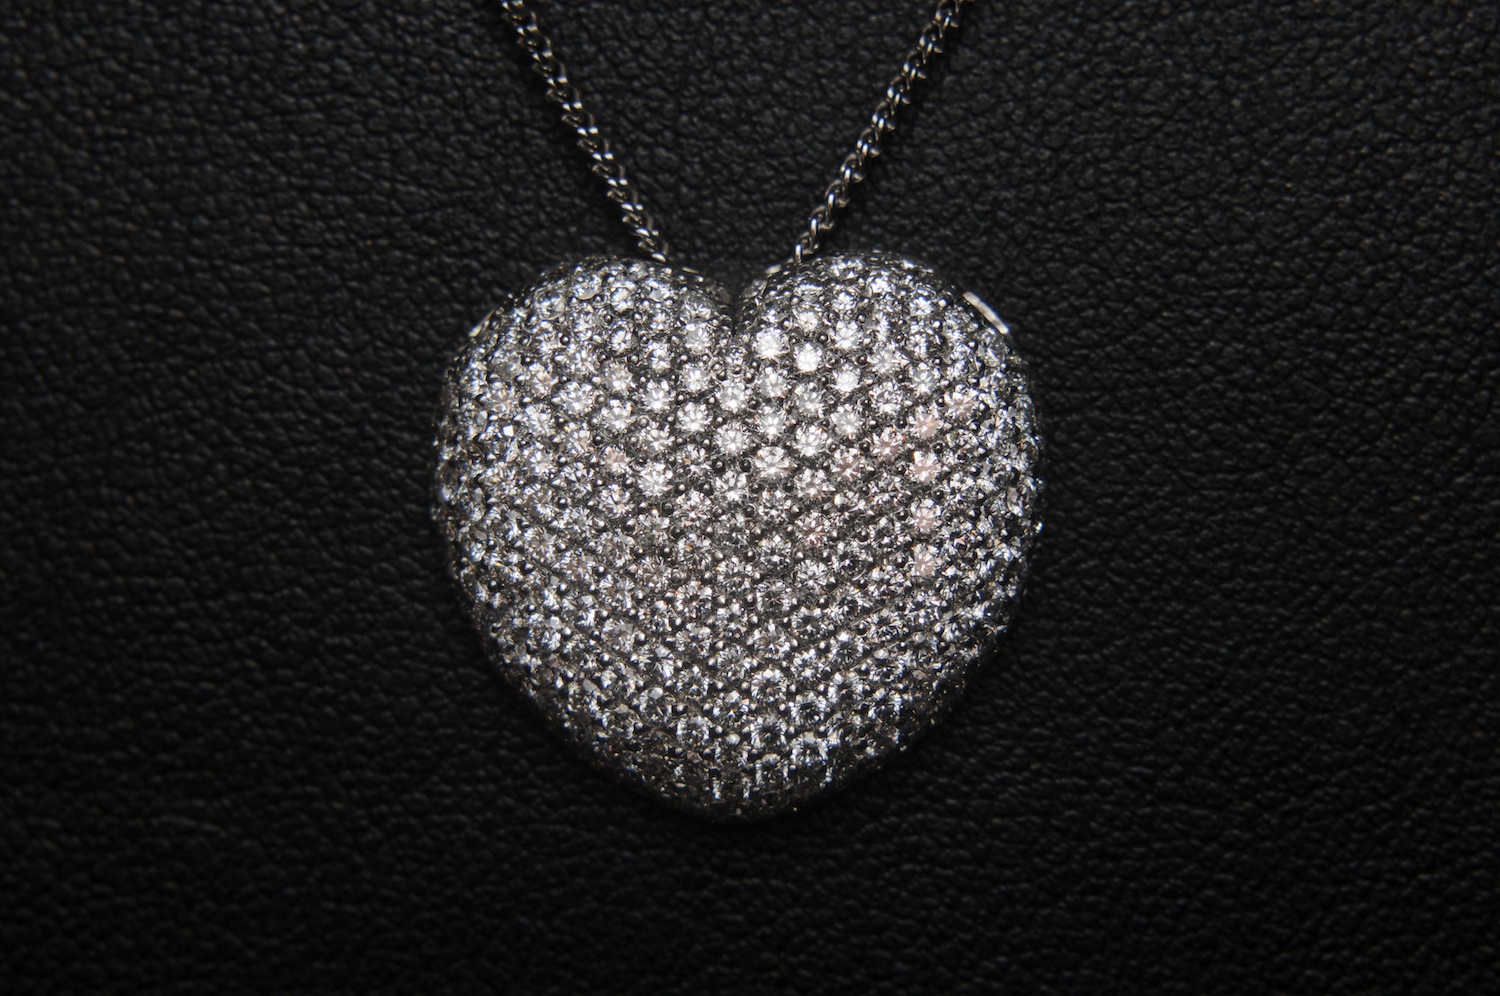
White gold and diamond heart pendant.
Details: 9ct white gold hand-made heart-shaped pendant, claw set with over 150 1pt diamonds.
11 March, 2013 Leave a comment
Another workshop piece while I learn the language of the blogger. This was for one of those customers who walks in with a pile of old jewellery and says “Make me something, anything. But, it has to be a bangle and old fashioned.” So you ask the question “How old fashioned? Fifties, twenties, 19th century…?” It soon turns out that they don’t want just anything. The diamonds were old cut and single cut so anything more modern than “art-deco” would not have suited – they can look a bit flat in contemporary design. Anything older than mid to late nineteenth century and the diamonds become too modern for the design. It’s either “art-nouveau” or “art-deco” to fit in with the materials supplied. This is the outcome, the first piece where I did everything, consult, design, manufacture and set.

Art Deco inspired gold and diamond bangle.
Details: 9ct yellow gold and white gold handmade bangle. Old-cut and single-cut diamonds, pavé and bezel set with milligrain edging.
10 March, 2013 2 Comments
Just an example of what I do to whet your appetite. A commissioned piece, a “family ring” with a child’s name engraved, a blue diamond for a boy and some incomplete engraving which will be continued when the new baby arrives. Manufactured in my workshop, including all the gem setting and engraving.
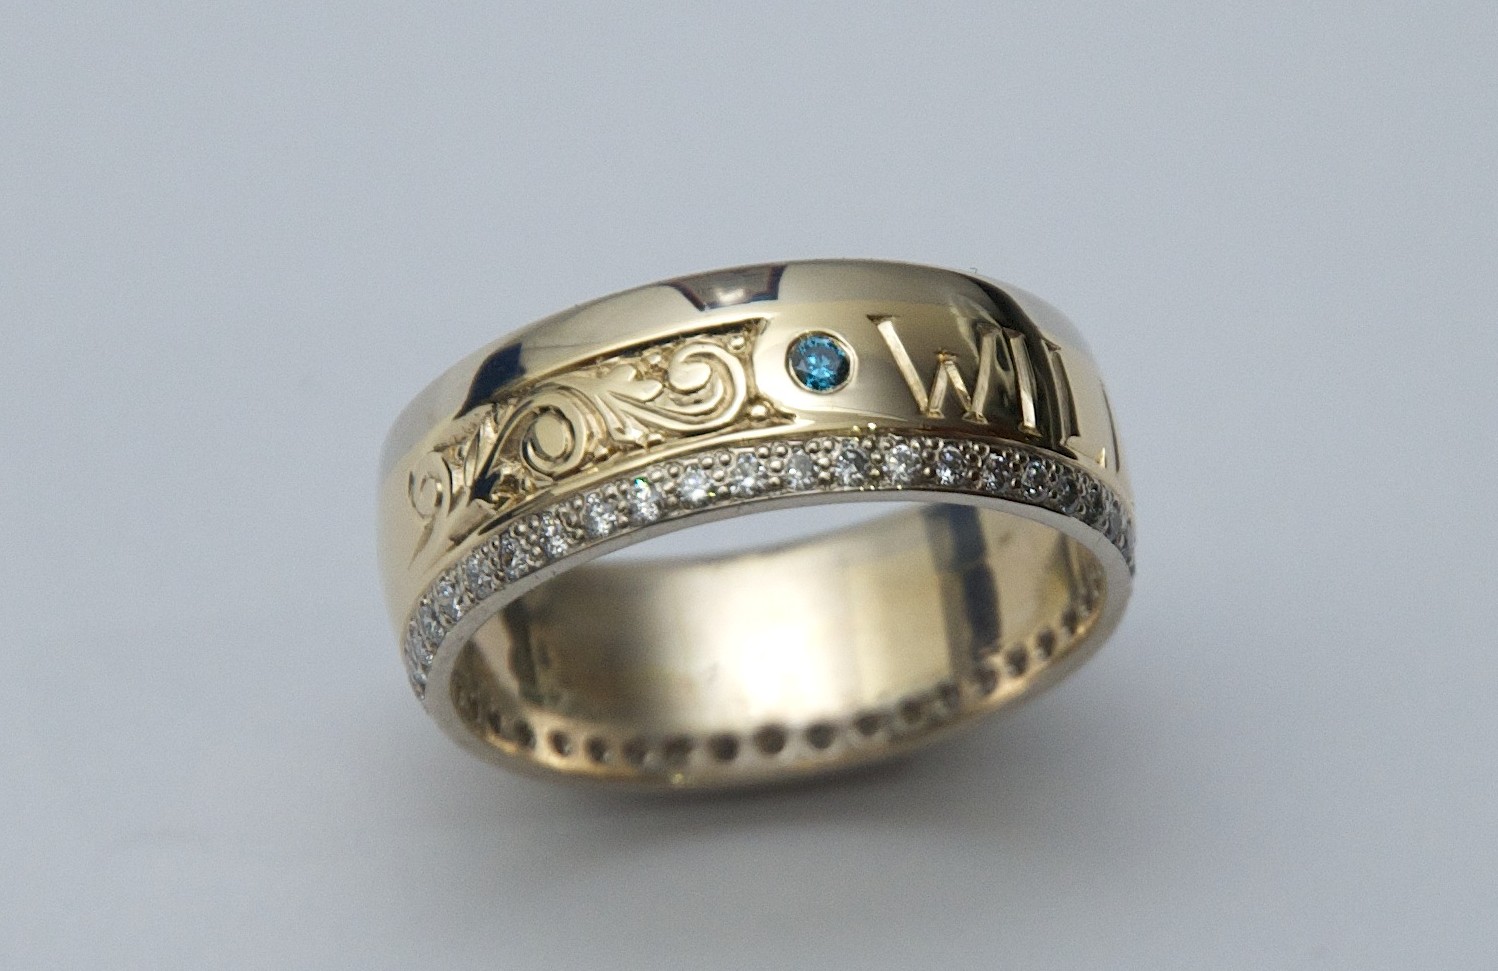
Family Inspired Wedding Ring
Details: 9ct yellow and white gold hand-made 7mm wide wedding ring, 1pt bead set white diamonds, 5pt pressure set treated blue diamond, hand carved name and scroll work.
10 March, 2013 Leave a comment
My main reason behind starting this blog was education. After teaching apprentices the “fine art” of jewellery for many years, I was offered a position to teach jewellery at the local university. That lasted for a few years and I consider it to be one of the best experiences of my career.
I have read other blogs and newsgroups and seen hobbyists asking for advice on making jewellery, only to see them be ridiculed by the professionals. It’s as if it’s a secret society. “Take it to your local professional” they say; “It’s not a job for the handyman”. I was making jewellery while I was at school; Quality goods are made on the streets of India, by kids no less. Neither of us had formal training at these stages, nor did we have sophisticated equipment, yet it got me a job and it feeds those kids. With that in mind “HOW HARD CAN IT BE?” Not very. I quite often let people come and use my workshop to get an experience. They walk away with something they made after only a couple of hours, in precious metal.
Anyway, using my experience at teaching apprentices and university students, the resources I used for both, and my 30+ years of making jewellery, I hope to be able to pass on a series of tips and techniques to help those who are interested. It’s not hard. Anyone can do it. So, ask a question, about the industry, a tip, a technique, an information inquiry,… I hope you like it.
